maandag 16 mei 2016

Yet another babyblanket


De babyboom die afgelopen najaar in mijn omgeving aangekondigd werd is op dit moment in volle gang. Voor een vriendin wilde ik ook wat maken. Ik informeerde daarom naar de wensen en eventueel kleuren van de babykamer. Als reactie kreeg ik een foto van de kleurenwaaiers ter inspiratie opgestuurd, roze en turquoise/mint-groen. Daar kon ik wel wat mee dus ik ging op zoek op pinterest naar mooie combinaties. Die leiden uiteindelijk tot dit kleurenschema in Stylecraft.

The babyboom that was foreseen last fall is in full boom at the moment. For a friend I decided to make a gift. I informed her of my plans and asked about her ideas and potential colours for the nursery. In response I got a photo of the colourwheels in pink and turqouise and mint green. I soon took this to Pinterest for inspiration and that lead me to this stylecraft colour combination.


Het patroon had ik al een keer eerder online gezien en leek me leuk om te maken. Ik zag het patroon als resultaat bij haar blog. De plaatselijke wolwinkel had alle kleuren die ik had uitgezocht liggen dus ik kon snel aan de slag.

I noticed the pattern online and stored it for future reference. I saw the results at her blog. The local yarn shop had all the colours I needed so I quickly went to work.


Ik besloot de grijze draad steeds mee te nemen naar de volgende toer, dat scheelde heel wat eindjes wegwerken. Als rand haakte ik er een toer grijs, roze en grijs in granietsteek. Dat geeft een leuk stipjes effect.

I decided to carry the grey yarn for each row, that saved me a ton of yarn ends to weave in. For the border I decided on rows of grey, pink and grey in moss stitch. That made a nice dotted edge.


Ik ben heel tevreden met het resultaat. De kraamvrouw was erg blij met het cadeau. Het zal snel gebruikt worden als het kleine meisje met haar trotse ouders naar buiten gaat.

I am very pleased with the result. The new mother was very happy with the gift. It will soon be used when the little girl will go outside with her parents.


zaterdag 7 mei 2016

Tadah baby boy blanket


Ik ben een hele tijd weg geweest van m'n blog. Geen tijd voor, druk op het werk, niet veel te laten zien. Veel excuses. Maar ik ga proberen hier weer regelmatig wat neer te zetten.
Mijn zusje is zwanger van een jongetje. Ik maakte voor hen een dekentje. Ik bestelde er al in februari katoen voor. Ik liet het katoen aan jullie zien in deze post maar het resultaat wilde ik nog een verassing houden. Nu is de babyshower geweest en kan hem eindelijk aan jullie laten zien.

I was away from the blog for a while. No time, busy at work, not much to show. Lots of excuses. I will try and show up here more often. 
My sister is pregnant with a little boy. I made a blanket for them. I ordered the yarn in februari and showed you the cotton in this post. The result had to be a surprise so after the babyshower I can finally show you the result.


Ik gebruikte voor het eerst een betaald patroon. Meestal vind ik op internet genoeg gratis inspiratie maar ik gun het degene die gratis patronen aanbieden ook om wat te verdienen aan al het werk wat ze er in stoppen. Daarnaast wilde ik niet zelf gaan zitten 'pielen'.
Voor een klein baby'tje schijn je beter natuurlijke materialen te kunnen gebruiken dus kwam ik op katoen uit. Ik gebruikte de aangeraden katoen uit het patroon: Rico creative Cotton Aran. 100% katoen en heerlijk zacht en redelijk dik dus het geeft een stoer resultaat.

I used a paid pattern for the first time. I normally find a lot of free inspiration on the internet though I think that the people who offer free patterns deserve some credit for al the hours they put into that. Also I didn't want to figure this pattern out myself so I bought it.
For a newborn you are supposed to use natural materials so I went with cotton. Actually the cotton from the pattern: Rico creative cotton aran. 100%  cotton, nice and soft and a true aran cotton that gives a 'though' result.


Het patroon was goed te volgen en uiteindelijk erg makkelijk met vooral stokjes met af en toe losse voor het opengewerkte deel. Daarom haakte het erg snel, ik had het binnen no time af. Ik vind het resultaat uiteindelijk erg goed gelukt. Ik hoop dan ook dat 'Ukkie' er lekker onder zal slapen en zijn ouders niet te veel wakker zal houden.

The pattern was easy to follow and a quick make because of the double crochet. I finished really quickly. I love the result and hope that 'Ukkie' will sleep nice and sound underneath it and doesn't keep his parents awake too much.


zondag 17 april 2016

Crochet socks


Met Kerst kreeg ik een bolletje sokkenwol waarmee ik mijn eerste paar echte sokken heb gemaakt. De slofsokken die ik eerder maakte waren altijd gebaseerd op een simpel model. Ik wilde ook wel eens 'echte' sokken maken. Ik ging daarvoor op zoek naar een beschrijving hoe je een hiel in je sok kunt maken. Die vond ik hier en hier. Wel in het Engels maar dat vind ik nooit zo'n probleem.

Under the Christmas tree I found a ball of sockyarn that i used to crochet my first pair of real socks. The slipper socks that I made earlier were based on a simple template. I wanted to make 'real' socks for a change. I searched for a pattern how to make a heel in a sock and found that here and here


Het eerste deel van het patroon gebruikte ik gewoon mijn eigen standaard patroon die ik eerder ook gebruikte. Daarna maakte ik de hiel en een korte rand vasten. Het enkel-deel haakte ik met stokjes, dat zit wat losser en geeft de kans om er een geribbelde rand aan te maken met reliefstokjes. Het enkel-deel is nog wel wat los daar moet ik in een volgende poging wat aan doen. Maar het komt denk ik zelf vooral door het gebruik van stokjes, dat is toch wat losser dan vasten.

The first part of the pattern I used my regular sock shape. After that I made the heel and a couple of rows single crochet. After that I used double crochet (treble) for the ankle which is a bit looser and gives the opportunity to use front-post and back-post double crochet. The ankle is a bit loose I will try to fix that in my next attempt. Though I think it is mainly because of the double crochet which are looser than single crochet.


En natuurlijk maakte ik er weer anti slip onder, vooral om te zorgen dat m'n vriend niet aan het schaatsen gaat door de woonkamer ;)

And of course I applied non slip  to the bottom to keep my boyfriend from skating around the living room ;)


woensdag 13 april 2016

Little striped bag


M'n vriend had laatst nieuwe oordopjes voor bij zijn telefoon aangeschaft. Voor je het weet zitten die in je tas overal omheen gewikkeld. Daarom wilde hij wel graag een zakje om ze netjes in op te bergen. Dat moest toch niet moeilijk zijn dacht ik en ik ging aan de slag. Ik tekende een mal op een ruitpapiertje en zocht met goedkeuring van vriend een restje blauw gestreepte stof uit.

My boyfriend recently bought a couple of earphones for his phone. We all know how they get tangled up quickly. That's why he requested a small bag for storage. That's not hard I thought and went to work. I made a template on some paper and found some striped fabric that was approved by the boyfriend.

Het op maat snijden was zo gebeurd. Ik zigzagde de zijkanten en nu kwam het aan op het in elkaar zetten. Ik streek de vouwen voor het tunneltje er vast in en naaide de zijkant aan elkaar. Daarna bedacht ik me dat het zo klein was dat het niet om de vrije arm van m'n naaimachine paste.  Ik besloot daarop maar gewoon per kant het tunneltje vast te zetten. Dat was even wat gepriegel met spelden maar lukte prima. Smal lintje erdoor en klaar was het zakje al.

I cut the fabric quickly so I could finish the raw edges. Now I 'only;  had to sew. I pressend the folds for the tunnel and sewed the long sides together. After that I realised that I couldn't fit the opening around my sewing machine. After some fidgeting I managed to sew each tunnel separately. A thin ribbon finished the bag.


dinsdag 5 april 2016

#Colourmyownbeach


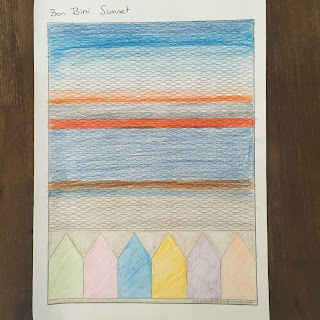
Dedri Uys van de blog lookatwhatimade.net schreef onlangs een kleurwedstrijd uit. Ja, je leest het goed. Zo een waarbij je de kleurplaat uitprint en dan ouderwets met kleurpotloden aan de slag gaat. Deze keer ging het om een ontwerp van haar 'Summer in Swanage' deken met de strandhuisjes met kans om een garenpakket te winnen in je eigen kleuren.

Dedri Uys from lookatwhatimade.net started a colouring competition recently. Yes, you read it correct.  A competition where you print out a page and then start using your good old crayons. This time it was a design for her 'Summer in Swanage' Blanket with beach huts with a chance to win a yarn pack in your colours.

Ik had die prachtige deken wel voorbij zien komen dus greep mijn kans en ging lekker aan de slag. Mijn kleurpotloden lagen er toch nog van een mindere periode vorig jaar. Ik moest meteen denken aan een Caribische zonsondergang. En bij Caribisch denk ik aan Bon Bini Beach op  Curaçao en de pastelkleurige huizen daar.  Dit geheel heeft geleid tot mijn ontwerp: Bon Bini Sunset.

https://www.instagram.com/p/BDsOyb7NISK/

I did see that gorgous blanket on social media so I took a chance and got colouring. My pencils were still lying around from a less happy time last year. The challenge reminded me of a Caribean sunset. And Caribean reminds me of Bon Bini Beach in Curaçao and the pastel coloured houses over there. All this led to my design: Bon Bini Sunset

zondag 3 april 2016

Scheepjes CAL 2016 Last Dance on the Beach

De Scheepjes CAL 2016 Last Dance on the Beach trok mijn oog met een aankondigingen op Facebook. Ik heb een tijd getwijfeld of ik mee zou doen omdat het weer een project aan mijn lijstje toevoegt. Toch maar besloten het pakket van Dance in the Sea te bestellen, vanwege het verhaal van Wink en super om al die steken te leren met als resultaat een mooie deken.

The Scheepjes CAL 2016 Last Dance on the Beach caught my eye with the annouchements on Facebook. I wasn't sure if I wanted to participate because it would add yet another project to my list. In the end I decided to order the package of Dance in the Sea. Because of the story of Wink and great to learn al these new techniques with a great blanket as result.

http://www.acreativebeing.com/wp-content/uploads/2016/03/10406867_537354826442764_8785978280702266737_n.jpg

Nu wachten tot de start op 20 april...

It's a long wait till the start on April 20...

vrijdag 1 april 2016

City tripping?


Een paar weken geleden deed ik mee met de give away van de blog de mooiste stedentrips. Esther van Happy in Red schreef over haar stedentrip naar Brugge, gaf uiteraard nog wat tips over wol-winkels en gaf een reisgidsje van 100% weg. En ik won! Super leuk. Nu alleen nog een stedentripje plannen.

A couple of weeks ago I took part in a give away of a blog on City trips. Esther from happy in Red wrote about her city trip to Bruges, local yarn stores and organised a give away of a 100% travel guide. And I won! Great. Now I only have to plan a city trip.
 

woensdag 30 maart 2016

WIP Wednesday


Zoveel ideeën zo weinig tijd. Ik startte de afgelopen tijd een aantal projecten maar wil nog niet alles laten zien. Vooral omdat ik niet weet wie hier meelezen en sommige cadeautjes toch een verassing moeten blijven :) Dus hier een post met wat voortgang en wat worteltjes cake.

So many ideas so little time. I started a couple of projects but don't want to show them to you. Mainly because I don't know who are reading along and I want some gifts to stay a surprise :) So here's a post
with some progress reports and some (carrot) cake.
Ik startte met een verzameling wasknijpers met deken-kleurtjes naar idee van Attic24. http://attic24.typepad.com/weblog/2016/02/blanket-planning-with-yarn-pegs.html

I started to collect yarn pegs with my acryllic blanket yarn after the idea of Attic24.

Verder had ik mijn eerste gehaakte sok met een heuse hiel al een tijd geleden klaar en duurde het even voor ik zin had te beginnen aan de tweede. Wat is dat toch? Ik heb hem nu in mijn WIP mandje op de bank gelegd zodat ik er af en toe een kwartiertje aan verder kan werken. Ooit komt ie af die tweede sok!

My first crocheted sock with a true heel was finished some time ago. It took some time before I wanted to started the matching one. I don't like that… The second sock is now waiting for me in my WIP basket. This way I'm reminded and every now and then I take 15 minutes. In the end I will finish!

Voor de kerst startte ik met een sprei voor ons tweepersoons bed. Al snel had ik meer wol nodig, de lokale wolwinkel had deze niet op voorraad dus moest ik bestellen. Daarna belande de wol en het project in de kast omdat er andere dingen tussendoor kwamen. Ik had toch wel een schuldgevoel over de hoeveelheid wol die daar lag dus haalde het project weer tevoorschijn. De granny stripes zijn makkelijk dus kan ik voor de TV haken. De finish is echter nog ver weg…

Before Christmas I started my bedspread for our double bed. I ran out of yarn quickly and had too order online since my local yarn shop didn't have the colors in stock. After the order was delivered the yarn and project ended up in the closet. Other projects came and went. The project was still nagging me so I decided to go through with it. Since it is easy granny stripes I can crochet while watching television. The finish is a long way to go though…

Zijn jullie ook altijd met zoveel projecten tegelijk bezig?

Do you also have multiple WIP's at the same time?

maandag 28 maart 2016

Sewing machine cover


In mijn nieuwe naaihoek kon een mooie hoes voor mijn naaimachine geen kwaad. De hoes die met de machine is meegeleverd was matige kwaliteit en saai. Ik zocht wat op Pinterest en vond redelijk wat 'schattige' voorbeelden. Dat was niet helemaal wat ik in gedachte had. In een bibliotheekboek kwam ik al eens een voorbeeld tegen met een oude spijkerbroek. Dat kwam mooi uit want een oude spijkerbroek verknippen leek me wel eens leuk. Je ziet soms zulke leuke dingen voorbij komen dus dit leek me een goed oefen project.

In my new sewing space I need a nice cover for my machine off course. The cover that came with my machine was low quality and boring. I searched Pinterest and found a lot of cute covers that weren't really my taste. In a library book that I borrowed for reference I spotted a cover using an old jeans. I liked that idea and I had an old jeans lying around. I like this kind of recycling projects and already saw some other ideas. So I thought this was a perfect practice project.

http://www.matri.eu/singer/naaimachine-singer-heavy-duty-4432#.Vvjus-aDdCZ

Ik maakte het mezelf niet makkelijk want ik wilde dat de hoes niet te ruim werd en mijn machine is niet helemaal rechthoekig. Ik ging dus aan het tekenen en rekenen. Ook wilde ik een aantal zakken en vakken voor het boekje en het pedaal. Op een aantal vrije momenten dacht ik er over na en steeds werd mijn 'ontwerp' wat beter. Op een gegeven moment had ik genoeg gedacht en besloot dat ik maar eens aan de slag moest. Zo gezegd zo gedaan en ik begon de spijkerbroek uit elkaar te halen voor bruikbare stukken. Ik besloot het mezelf niet te moeilijk te maken en met name de pijpen te gebruiken. Als accent om het op te fleuren wilde ik een stuk gewone katoen gebruiken. Het bleek ook hard nodig omdat de spijkerbroek niet genoeg stof bevatte.

I didn't make it too easy for myself because I didn't want a loose fit and my machine isn't exactly rectangular. So I sketched and calculated. A couple of pockets for the booklet and peddal was also a wish. It took quite some time before I was satisfied by my 'design' and I could start ripping the jeans. I only used the legs to not make it too hard for myself. For a pop of coulour I used some canvas. In the end I needed that addition because the jeans didn't have enough fabric.


Na het knippen en strijken kon ik de stukken spijkerbroek aan elkaar zetten dat ging prima totdat ik aankwam bij de bovenkant. Ik had nog nooit iets vanuit drie hoeken in elkaar gezet. Uiteindelijk is het niet super netjes geworden maar voor een naaimachine hoes best acceptabel.

After the cutting and pressing I started sewing away. That went fine untill I reached the top. I never made something 3D. I think it turned out okay for a first attempt and a sewing machine cover.


Heb jij ook je eigen naaimachine hoes gemaakt?
 
Did you make your own sewing machine cover?


donderdag 24 maart 2016

The mobile backpack


Ik blogde laatst al over mijn avontuur bij de lokale kringloop. Ik kocht er een dekbed overtrek met auto'tjes. Leuk voor projecten voor jongetjes dacht ik zo. En voor meisjes, ik werk tenslotte zelf ook in infrastructuur ;). Ik besloot er een rugzakje mee te maken volgens het patroon dat ik eerder gebruikte voor de superhelden rugzak.

I wrote about my adventure at the local thriftshop thriftshop. I bought a duvet cover with cars there. Nice for projects for little boys I thought. And for girls, since I also work in the infrastructure business ;). I decided to make a drawstring backpack using the same pattern I used for the super hero backpack.


Ik maakte één recht-toe-recht-aan versie maar wilde ook nog een geavanceerdere maken, met meerdere vakken. Dus ik prutste wat met wat extra stukjes stof. En hier is mijn tasje met een tussenschot en vakje voor een mobiel of sleutels.

I made one straight forward version of the bag and another advanced one with multiple pockets. So I tried something with some extra fabric. This is the result of the bag with and extra division and a pocket for a phone or keys.


Voor het koord gebruikte ik veters van de Action. Goedkoop en makkelijk te krijgen :)

For the drawstring I used shoelaces from a budget store. Cheap and easy to buy :)


dinsdag 22 maart 2016

Sewing space

Before

Ik vertelde jullie al over mijn naaikamer in wording hier en hier. Als je me op Instagram volgt heb je vast al gezien dat hij af is! Eindelijk ben ik er ook aan toe gekomen om er over te schrijven.

I told you about the WIP sewing room here and here. If you follow me on Instagram you will have seen that I finished it. I finally got around to writing about it.

Na de inkopen bij IKEA duurde het even voordat we een weekend hadden om eraan te werken. Ik kon me niet lang bedwingen en zette doordeweeks al een keer het bureau in elkaar. Samen met Vriend ging ik op een zaterdag aan de slag om het project af te ronden. Er stond in het hoekje een stoel met sportkleding die snel verplaatst was. De kast met alle naai- en haakspullen haalde ik helemaal leeg om te verplaatsen. Het logeerbed lag helemaal vol, blijkbaar heb ik toch best wel wat spullen verzameld de afgelopen periode :D

After the shopping at IKEA it took some time before we had another weekend to work on the project. I could not contain myself and started constructing the desk myself in the evening on a weekday. On Saturday the Boyfriend and myself went to work. The sportsstuff was easily moved. The closet with my crochet and sewing stuff was another story. I packed the whole guest bed with the stuff. Guess I collected more 'stash' then I thought :)

the making off
We schoven daarop de kast opzij en monteerde de plank. Eronder kwamen de stangen met bakjes. Het bureau is op wielen zodat hij makkelijk uit het hoekje te halen is als ik stof wil knippen. Om de kast en muur te beschermen plakte ik er wat vilt en dopjes op. Het bureau werd aangeschoven, de plank gevuld en klaar was mijn hoekje alweer. Ik ben er super blij mee. Het is erg makkelijk om één plek te hebben voor projecten en reparatiewerk. Voor de aankleding is de volgende stap een naaimachine hoes te maken van een oude spijkerbroek.

When emty the closet could easily be pushed to the side and mount the shelf. Underneath the shelf we placed the bar for loose notions and tools. The Desk has wheels to easily retrieve it from the corner when cutting fabric. To protect the desk I glued some felt to the corners. The desk was then pushed into its corner and all my stuff back into position. I'm really happy with the result. It's easy to have one spot in the house for projects and repairs. My first step for dressing up is a cover for my sewing machine from an old jeans.  

After_1
After_2
In use

zondag 20 maart 2016

Crochet four seasons: Quick Easter egg garland


Naast het paaskuiken wilde ik nog wat maken voor Pasen. Maar, wel iets snels graag :). Ik vond het patroon van een leuke paasei-slinger online. Ik vond deze leuke pastel-paas kleurtjes in mijn voorraad.

Besides the easterchick I wanted to make something else for Easter. But I wanted it finished fast please :). I found the pattern for a Easter egg garland online and some pastel coloured cotton in my stash.

 
De slinger bestaat uit 11 eieren die uit drie toeren bestaan en dus zo gemaakt zijn. Ik deed afgelopen week naast mijn andere project steeds een paar eitjes. Vrijdag had ik de slinger al af en kon deze aan ons plisse-gordijn bevestigd worden.

The garland is 11 eggs long, each egg is 3 rounds which is quick. Last week I made a couple of eggs each evening besides my other project. Friday the garland was finished and I attached it to our shade.


Misschien doe ik deze week ook nog mee aan de Wolplein paas-CAL als vulling van de paastak die nu met 'originele' plastic xenos eieren versierd is.

Maybe I will participate in the Wolplein Easter CAL to fill my Easter branches. In the meantime I decorated them with 'original' plastic eggs from the budget store.

donderdag 17 maart 2016

Sneak peek new project


Ik had zin om iets nieuws te maken. Maar ik maak mijn projecten graag met iemand in gedachte. Daarom nam ik één van mijn zwangere vriendinnen in gedachte. Ik viste bij haar wat naar de toekomstige babykamer. Ze stuurde me daarop de kleurenwaaiers die ze daarvoor ging gebruiken. Een combinatie van turquoise en roze accenten had ze daarvoor in gedachte. Pinterest bood raad. Ik vond er hele leuke kleurencombinaties. Uiteindelijk kwam ik bij een kleurencombinatie van haar uit. Ik toog naar de lokale wolwinkel en vond daar in het assortiment Stylecraft de kleurtjes. Ik moet zeggen dat ik er zelf niet zo snel op was gekomen maar ik vind het een hele frisse combinatie geworden. Het blijft voor jullie alleen nog even een verassing, ik wil niet dat ze al ziet wat het geworden is…. Dus hieronder alleen een sneakpeek van de eerste toeren.

I wanted to start a new project. But I like to make my projects for someone. That's why I chose one of my pregnant girlfriends as subject. I asked her about the future nursery. In reaction she send me the colour wheels she would be using for that. A combination of pink and turquoise accents it will be. Pinterest showed me some prette cool colour combinations. I finally found a coulour recipe from her. With that in mind I went to my local yarn store and found some a great combo from Stylecraft. I have to admit that the colour combination didn't appeal to me at first but I think it is refreshing. For you it will stay a surprise though. because I don't want to spoil the surprise... So I'll only give you a sneak peek of the first rows.


Het wordt dus een streeppatroon met verschillende kleurtjes die ik nog even een verassing hou voor jullie. Wordt vervolgd...

It will be a stripe pattern, the colours will remain a surprise for you guys. To be continued...